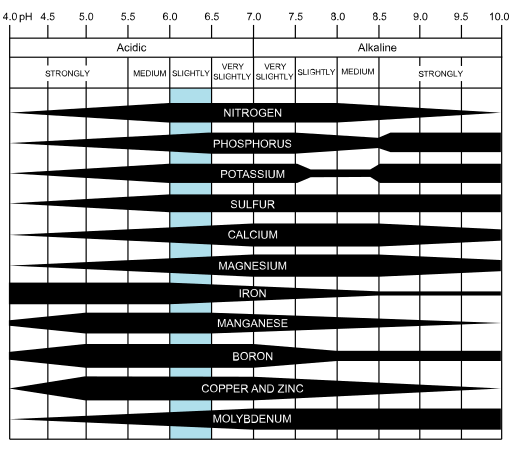
Why is pH Important in Soil? pH of soil is important because it affects the availability of nutrients within the soil to plants. Plants require a range of elements, which include Nitrogen, Phosphorus, and Potassium in relatively large quantities. Other important nutrients required in smaller quantities are Calcium, Magnesium, and Sulphur. There is also a range of micronutrients, required by the plant in very small amounts, such Zinc, and Manganese. Generally, a soil pH of 6.0-7.5 is ideal for most plants, as most nutrients become available in this pH range.
The chart below shows how the availability of these important nutrients is affected by the pH of the soil. The thicker the line, the greater the availability of the nutrient at a particular pH.

What is a pH and Why Does it Affect Nutrient Availability?
The pH of a solution is defined as the concentration of Hydronium Ions (H3O+) present in a solution. This is often referred to by chemists as just Hydrogen Ions (H+) and is most commonly generated by the ionization of water, which produces Hydroxide Ions as well (OH–) as per the equation below.
H2O → H+ + OH–
At a neutral pH of 7, the concentration of Hydrogen and Hydroxide Ions are equal. When an acidifying agent, or acid is added to water, the concentration of H+ increases, and the pH reading of a solution falls. What many people do not realize is, that it is a Logarithmic scale, ie moving from a pH of 8 to 7 represents a 10 fold in the increase in Hydrogen Ions concentration, and moving from a pH of 8 to 6 represents a 100-fold increase.

The significance of this to the soil chemistry is that it affects the solubility of nutrients in water. Nutrients that readily dissolve in water can be taken up through the roots of plants, easily increasing the availability of a particular nutrient.
An example of this is Calcium Carbonate (limestone), which is an insoluble powder in water, at a neutral pH but starts to solubilize at a reduced pH.
How To Test the pH of Soil
Testing your soil’s pH is best done around the end of Autumn as this will allow adjustments to the pH to be made in Autumn and Winter so that the soil is ready for Spring planting. It can be estimated by using household chemicals or red cabbage. However, if a more precise reading is required, a testing kit may be purchased on Amazon.
Testing pH Using Household Chemicals
- Take a soil sample using a hand shovel. It is best to take the sample from multiple points in the garden at a depth of 10-15cm (4 to 6 inches), and test each sample individually.
- Remove stones, sticks, and other debris from the soil and break up any large clumps.
- Add enough water together to create mud.
- Add 250mls of Vinegar, and stir slightly. If any fizzes, foams, or bubbles are observed, your soil is Alkaline.
- If no bubbling occurs, repeat steps 1 to 4 and add 1/2 Cup of Baking Soda, and stir slightly. If the soil fizzes, foams, or bubbles, your soil is Acidic.
Testing pH Using Soil Strips
To test using a pH kit for a more precise measurement, the following steps are required.
- Take a soil sample using a hand shovel. It is best to take the sample from multiple points in the garden at a depth of 10-15cm (4 to 6 inches), and test each sample individually.
- Remove stones, sticks, and other debris from the soil and break up any large clumps.
- Add enough water together to create mud then, let the solution rest for 30 minutes.
- Filter the sample through a cloth or coffee filter.
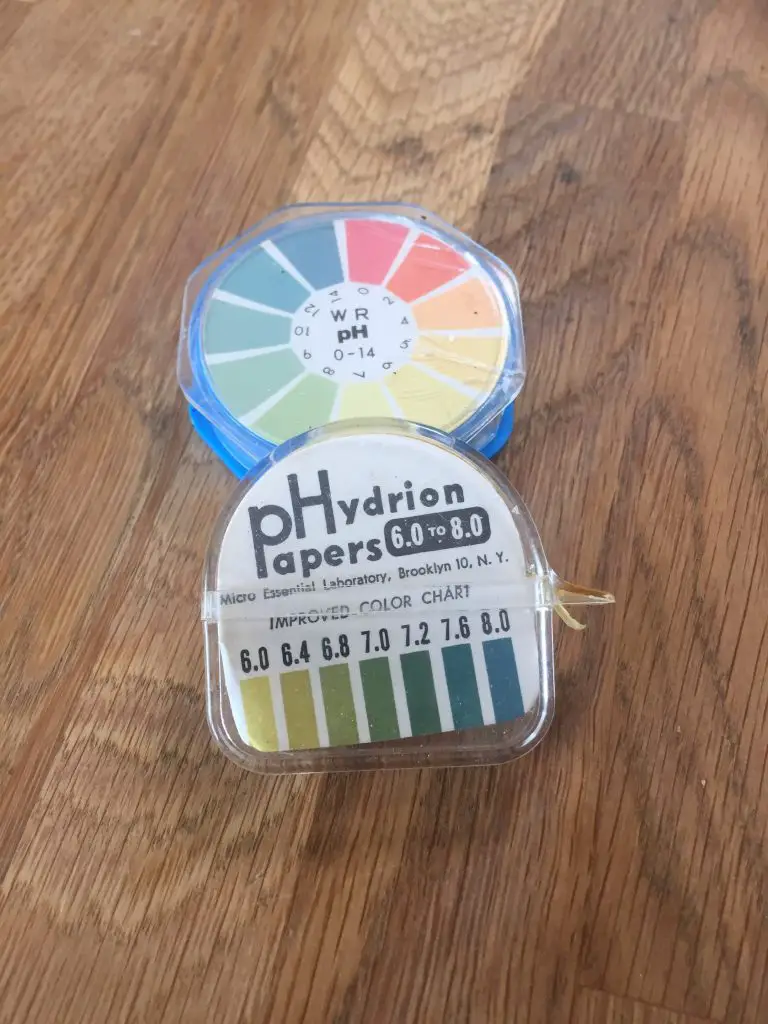
- Dip the pH test strip into the liquid and compare the colour it turns, to the chart on the manufacturer’s packaging to determine the pH.

Make Your Own pH Test Kit
If you don’t want to buy a pH kit, you can make your own pH indicator solution from red cabbage. It is not as accurate as a commercial kit, but it will give you a better idea than the other homemade test above.
Red cabbage contains a pigment molecule called Flavin (an Anthocyanin). This water-soluble pigment is also found in apple skin, plums, poppies, cornflowers, and grapes. Very acidic solutions will turn Anthocyanin a red color. Neutral solutions result in a purplish color. Alkali solutions appear greenish-yellow.
To make the solution, chop the Cabbage into small pieces until you have about 2 cups of chopped Cabbage. Place the Cabbage in a large beaker or other glass container and add boiling water to cover the Cabbage. Allow at least ten minutes for the color to leach out of the Cabbage. Filter out the plant material to obtain a red-purple-bluish colored liquid. This liquid is at about pH 7. Use the same steps to prepare the sample and then add the indicator solution. Match the colour with the photograph below.

Adjusting soil pH for Vegetables
The ideal pH for most vegetables is approximately 6.5 to 7.0. If the pH range falls outside that range it is possible to correct it.
Increasing soil pH maybe achieved by applying lime or wood ash to your garden at a rate of 0.5 to 1 kg per 10 square metres (1 to 2 pounds per 100 square feet). It takes at least a few weeks to a couple of months to see the full effect of the treatment. To accelerate this affect, hydrated lime may be used and digging it in will further accelerate the process.
Decreasing Soil pH can be achieved by adding either Aluminum Sulfate or Sulfur. However, Sulfur is preferred even though it is slower acting because Aluminium can have a negative effect on the plant as it can become toxic if the concentrations get too high. Apply it at a rate of one handful per square metre.

What Vegetables Like High Alkaline Soil?
Most vegetables like Acidic soils with a pH between 6.5 and 7.0. However, if your soil is Alkaline, below is a list of vegetables that will tolerate those conditions.
- Asparagus (6.0-8.0)
- Beans, pole (6.0-7.5)
- Beet (6.0-7.5)
- Brussels Sprouts (6.0-7.5)
- Cauliflower (5.5-7.5)
- Garlic (5.5-8.0)
- Kale (6.0-7.5)
- Pea, sweet (6.0-7.5)
- Pumpkin (5.5-7.5)
- Spinach (6.0-7.5)
- Crookneck Squash (6.0-7.5)
- Tomato (5.5-7.5)
