
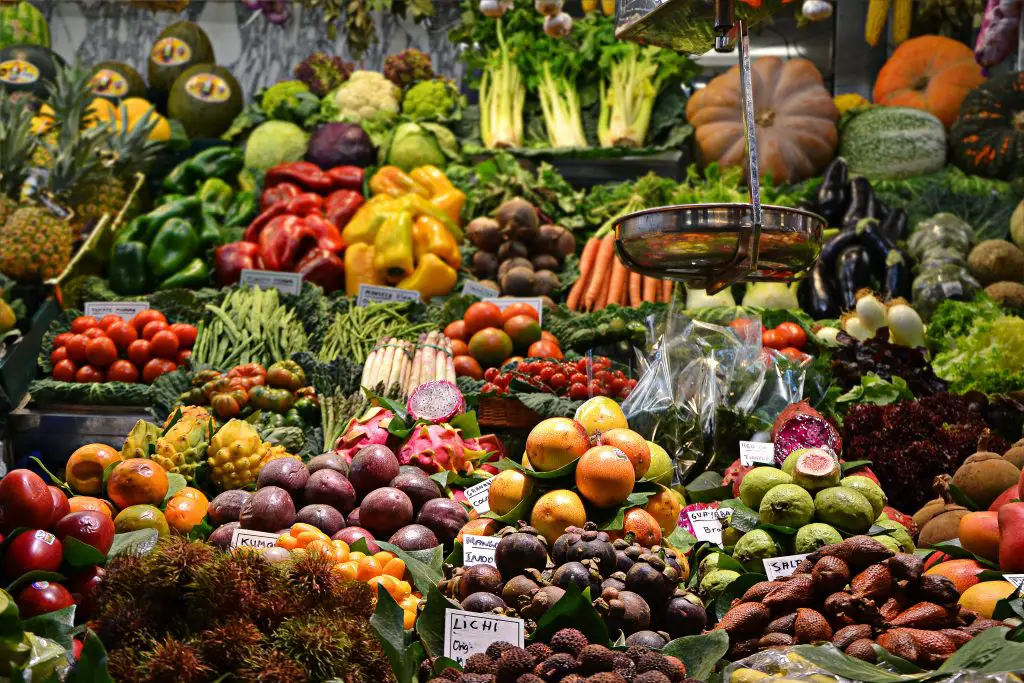
How Do You Store Home Grown Vegetables? For any home gardener wanting to make the most of their harvest and become more self sufficient, it is important to know how to store your harvest. Understanding this will impact;
- The choice of vegetable grown.
- The quantity of vegetable grown.
- The variety of a particular vegetable (not all varieties of a particular vegetable will store the same way).
- The timing of when the vegetable will be grown (the size of the vegetables can impact the storage life).
There are many methods that can be used to store your garden produce, however when considering which method to use, it is best to look at traditional methods first. These methods are generally cheaper to implement and provide scope to store greater volumes of food. The modern approach to storing food is to freeze everything.
These methods include;
- Dehydration
- Pickling
- Fermentation (which is a form of pickling)
- Freezing
All of these methods are discussed later in the article. However, it should also be noted that there are many vegetables that can be stored for a extended period of time without the need to process them in an specific way. These are mainly root vegetable but also extend to some brassicas and alliums. A list of these vegetables is provided below.
| Vegetable | Comment |
| Beetroot | Beetroots are best stored in damp sand. In these conditions they will store for several months. |
| Cabbage | Green, Red and Savoy Autumn cabbages will store well in the right conditions for 2-3 months. Summer cabbages will not store nearly as well. To read more about the different varieties click here. |
| Carrot | Carrots can be left in the garden throughout the winter period. If there is a need to lift them from the garden. They need to be stored in damp sand. To read more about carrots click here. |
| Celeriac | Celeriac can be stored in the garden in regions where the ground does not freeze. When picked they can be stored for 2 to 3 months. |
| Kohlrabi | Kohlrabi that grows in the Autumn are much large then those grown in Spring and will store well in the winter months. To read more about Kohlrabi click here. |
| Leeks | Leek is a hardy vegetable that can be left in the garden throughout winter. They will also store well for 2 to 3 months in the right conditions when picked. To read more about leeks click here. |
| Onions | Onions will store well for an extended period of time if Mid to late season varieties are grown. The learn more about the different varieties of onions click here. |
| Parsnip | Parsnips can be left in the garden throughout the winter period. If there is a need to lift them from the garden. They need to be stored in damp sand. To read more about parsnips click here. |
| Pumpkins | Pumpkins will store for 6 to 12 months if the stem is not removed from the fruit. To read more about storage of pumpkins click here. |
| Potato | Main crop potatoes will store several months in the right conditions. Early season potatoes do not store nearly as well. To learn about the differences click here. |
| Sweet Potato | Sweet Potatoes can be stored for 2 to 3 months. |
| Swede (Rutabagas) | Swede can be left in the garden throughout the winter period. If there is a need to lift them from the garden. They can be stored for 3 to 4 months at least. |
| Turnip | Turnips can be left in the garden throughout the winter period. They will store well for 2 to 3 months. |
The Ideal Storage Conditions For Vegetables
To avoid using a freezer, it is important to understand what are the conditions that most vegetables prefer, and create spaces that maintain those conditions for an extended period of time.
Unsurprisingly most vegetables in the list above prefer a dark, cool location that are generally well ventilated. The exclusion of light is important for most vegetables because it will generally cause the vegetable to sprout. The ideal temperature needs to be maintained at around 4°C (39°F) and generally, fluctuations in temperature should be avoided if possible.
The ventilation of storage spaces is also quite critical because it prevents a build up of moisture within the space. Excess moisture can create the potential for mould and bacteria to grow, which will reduce the shelf life of the vegetables. One of the reasons that the space can become moist is because the vegetable themselves contain a significant amount of moisture that leaches out into the atmosphere over time.
Creating Spaces To Store Vegetables
There is a number of ways to create spaces that are suitable for storing vegetables. The cost of these structures can vary significantly, depending upon the size of the space being created.
The traditional structure used to store vegetables is in a Root Cellar. Root Cellars are typically constructed with walls of the structure, partially or fully submerged into the soil. This is done to minimise the fluctuations in temperature and keep the vegetables cool throughout the year. The materials used to construct the walls are typically dense and have good thermal insulating properties. Materials such as Hebel and Besser blocks are often used.

Information on how to create a root cellar is available from many sources on the internet, one such source is Walden Labs. Click here to learn more.
However, for many people creating a full sized Root Cellar is not a realistic option either due to cost, space or simply they don’t grow enough to justify putting one in. For those people, there are many alternatives that are very cheap to create, or in some cases, completely free.
Storage Spaces
By far, the easiest option is to simply look for spaces around the home that already exist and require minimal alteration. Some of the best places around the home are under the house, as these areas remain dark and cool, for most of the year. However, consideration needs to be given to protecting your produce from vermin.
The easiest option is to containerise the produce in Polystyrene Vegetable Boxes. These types of containers can often be found at the rear of Green Grocery stores, as they are often thrown away. These containers are particularly suitable for this purpose because they are water proof and have excellent thermal properties.

However, ventilation needs to be inserted into the box to ensure that the vegetables do not sweat, inside the containers. This is best done in the sides of the containers, with PVC piping. The end of the piping should be covered with some material or fly wire to prevent insects from getting in.
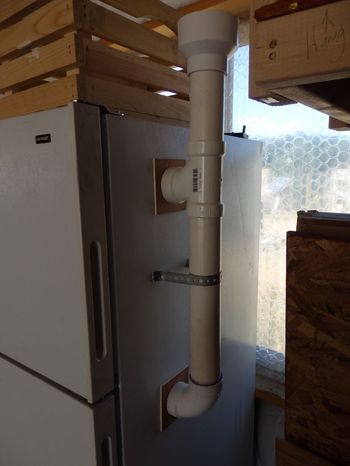
Other alternatives to this, is to use an old fridge or freezer as a Root Store. They are particularly suited to this purpose because they are heavily insulated and have a sturdy door, that provides easy access. Like the Polystyrene containers above, they require ventilation. There are many guides on the internet on how to do this. One example of this is on High-Desert-Homesteading.com, click here for more information.
Other alternatives to create a Root Storage space is to bury water tight containers in the garden. Options for containers include using an old fridge or freezer or a smaller container like a stainless steel bins, these are available on Amazon. However, like other options mentioned these containers require ventilation.
Another consideration that makes using containers in the ground easier is having a container within a container. The reason for this is it allows you to lift the stored vegetables out of the ground making them easier to access.
When selecting a location for vegetable stores where possible try to select shady locations to prevent direct sun from hitting the storage vessel. If this is not possible consider adding additional layers of insulation.
Vegetable Clamps
The other traditional method used by gardeners is a clamp. Clamps were traditionally used by the Victorians to store potatoes for the most part. However, this method is also suitable for other root vegetables.
To bild a clamp start by selecting an area of ground that is relative dry and water is unlikely to pool, even in the worst of weather. Once the location is selected place a thick layer of dry straw on the ground, at least 10 cm (2 inches) thick. Pile the root vegetables onto the straw to create a pyramid of vegetables.
Cover the pyramid of vegetables with a thick layer of straw of a similar thickness to the straw placed on the ground initially. Once the vegetables are completely covered add a layer of dry soil on top. The layer should be at least 10cm (4 inches) thick. To apply the layer start at the base of the clamp and work your way up the sides of the clamp until you reach the top of the clamp.
When you reach the top of the clamp leave a small amount of straw poking out the top. The width of this should be approximately 2 inches. The purpose of this is to ensure that the vegetables are ventilated and to ensure moisture does not build-up within the clamp.
Clamps may also be partially sunk into the ground as well. This requires you to dig a hole before beginning the construction of the clamp. The advantage of this method is that it will regulate the temperature better than clamps above the ground. The disadvantage of this is there is a greater risk of water building up at the base of the clamp. To manage that risk it is best to have a thicker layer of straw in the base of the clamp.
The main disadvantage of using a clamp over using containers is it is alittle more difficult to get access to the vegetable as you need to uncover the layers of soil and straw.
Other Storage Methods
For vegetables that spoil more ready than root vegetables specific processing is required to enjoy the produce year round. The process used is selected based on how you intend to use the food in the future. One popular technique is dehydration.
Dehydration
Food dehydration is one of the oldest techniques known for food perseveration. The removal of water inhibits the growth of bacteria and fungus which generally thrive in moist wet environments. This reduces the rate of spoilage significantly.
There is evidence that dehydration was being widely used in Egypt around 12,000 B.C.E, where the desert heat was used to dry fish and poultry. In Europe, in the Middle Ages, specific buildings known as stillhouses were constructed to dry fruits, vegetables and herbs using the heat of a fire. This was necessary due to the cool damp weather.
Dehydration may be done in several different ways;
- Using an Oven
- Using a Dehydrator
- Using a Solar Dehydrator

How to Dehydrate Fruits & Vegetables Using an Oven
To dry fruit and vegetables preheat the oven to the lowest setting possible. This will vary depending upon whether it is gas or electric, gas ovens tend to have a higher minimum temperature. Line your baking trays with nonstick baking paper and place the vegetables onto the tray. The length of time required to dry will vary depending upon the type of vegetable and the size that it is cut. Some experimentation will be required to perfect the technique as everyone’s oven is different.
During dehydration it is best to rotate the produce occasionally as this will speed up the drying process. Once the fruit or vegetable is dried sufficiently place them on a cooling rack. Once they have reached room temperature place the fruit or vegetable into airtight container.
How to Dry Fruits & Vegetables Using a Dehydrator
If you are considering doing alot of dehydration buying a dehydrator is worth while as is provides much greater control over temperature than an oven. Most dehydrators have an adjustable temperature with an operating range of 40 to 70°C (104°F to 158°F). Some will have a timer that will allow the machine to shut off automatically. That is a feature that you generally want to have.
The dehydrators vary in cost, like most things, depending on the quality. The main difference is the quality of construction, lower cost dehydrators tend to have trays made of plastic that are a little less durable but they general work well and a quite suitable for anyone starting out. I personally have one of these lower cost models, that has generally work well for around 5 years. To see the model I use click here.
The high end models generally have trays made of steel which will last longer and some have use timers which are programmable, click here to see an example. I personally haven’t tried these more expensive models so I can speak about the performance difference with any sort of authority.
However, what I have noticed, in my own dehydrator is that the length of time it takes to dehydrates increases with the volume of fruit or vegetables in the dehydrator. Additionally, the position of the trays within the dehydrator affects the rate of drying. Trays that are closer to the fan and heat dry faster. So you may need to rotate the position from some trays despite what manufacturers say.
Using a Solar Dehydrator to Dry Fruit and Vegetables
Solar Dehydrators are similar to the electric ones mentioned above except that the do not require any energy to run. Most solar dehydrators have a similar design to the commercial ones mentioned above in that they have a drying cabinet with trays to place the food. The main difference is that they a typically have an additional solar chamber attached to the bottom of the drying cabinet.
The solar chamber typically consists of a box with open ends, painted black with a glass top. These feature maximise the collection of solar energy that is used to heat the air as it flows into the drying cabinet. The solar chamber is usually placed on an angle of 30 to 45 degrees below the drying chamber as it allows air to enter the bottom of the chamber where it is heated before rising into the drying chamber. There are many different plans available on the internet for one example click here.

The operation of a solar Dehydrator is no different to the electric version except that there is no thermostat controlling the temperature. However, the temperature can be partially controlled by the volume of air passing through the dehydrator.
Preparing Fruits & Vegetables for Drying
Step 1: Pick produce at the peak of the season. Irrespectively of the drying method used it best to use blemish free fruit as it will taste and store better. As such it is best to pick produce as it is ready and dehydrate vegetables in small batches.
Step 2: Wash and Peel Vegetables. Peeling is optional, however it should be noted that the skins become tougher when dehydrated.
Step 3: Thinly slice vegetables. The thickness vegetables determines they rate of drying. It is best to go for a thickness of around 0.5 cm (0.25 inches) as they will dry relatively quickly.
Step 4: Dip in Citrus Water (Optional). Some produce, such as bananas and apples, can brown. To avoid this soak pieces in 1 to 1 solution of lemon juice and water for 10 minutes. Remove the produce from the solution and allow it to dry on paper towels before placing it in the dehydrator.
Step 5: Blanch in boiling water (Optional). For some vegetables like peas and sweet potatoes it is beneficial to blanch them to preserve bright colours. For directions on how to blanch go to the Freezing Section of this article.
How to Store Dried Produce
To maximise the shelf life of dried foods the presence of moisture needs to be minimised. Dehydration is complete when the foods are totally dry to the touch and the texture is crisp and brittle, though some foods can become leathery.
Once dehydration is complete cool the produce to room temperature before packing into an airtight container. Suitable containers include home canning jars, plastic freezer containers with tight-fitting lids or in plastic freezer bags. Vacuum packaging is also a very good option, Vacuum sealing machines are relatively cheap to purchase from Amazon, less than $50USD.
When packing foods it is best to pack them in quantities that can be used all at once. This is because opening and closing containers exposes the food to air and moisture which can result in spoilage.
When storing containers with dried foods it is best that it is in an area that is cool and dry, dark areas. Dried foods will typically last 6 to 12 months however, there are some articles that claim a shelf life of upto 5 years.
A list of the Fruits, Vegetables and herbs that are suitable for dehydration is provided below.
Fruit
- Apples
- Apricots
- Bananas
- Blackberries
- Blueberries
- Cranberries
- Cherries
- Figs
- Grapes
- Kiwis
- Oranges
- Mangoes
- Papaya
- Pears
- Persimmon
- Pineapple
- Plums
- Raspberries
- Strawberries
- Watermelon
Vegetables
- Asparagus
- Beets
- Broccoli
- Carrots
- Cauliflower
- Celery
- Corn
- Cucumber
- Eggplant
- Green Beans
- Kale
- Mushrooms
- Okra
- Onions
- Peas
- Peppers
- Potatoes
- Squash
- Tomatoes
- Turnips
- Zucchini
Herbs
- Basil
- Chives
- Oregano
- Parsley
- Rosemary
- Dill
- Fennel
- Mint
- Hyssop
- Lavender
- Sage
- Thyme
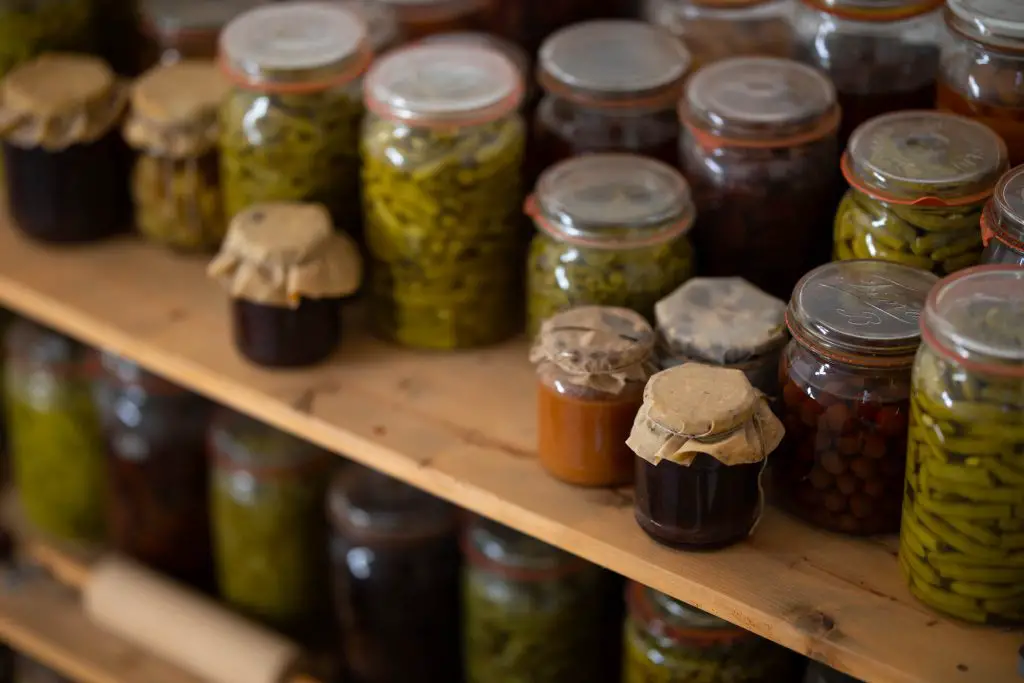
Pickling
Pickling is another traditional method that has been used for thousands of years. The method can be categorised into 4 general methods which are as follow;
- Quick Pickle (also referred to as Fresh Pickles)
- Salt Brined Pickle
- Vinegar Brined Pickle
- Fermentation Pickle
Each pickling method has advantages with some suiting different types of fruits and vegetables.
The Quick Pickle Method
The Quick method is a method that tends to be used for storing whole vegetables and/or fruits that are trimmed. However, you may also choose to chop or slice the produce if it makes it easier to fit the vegetables in jars.
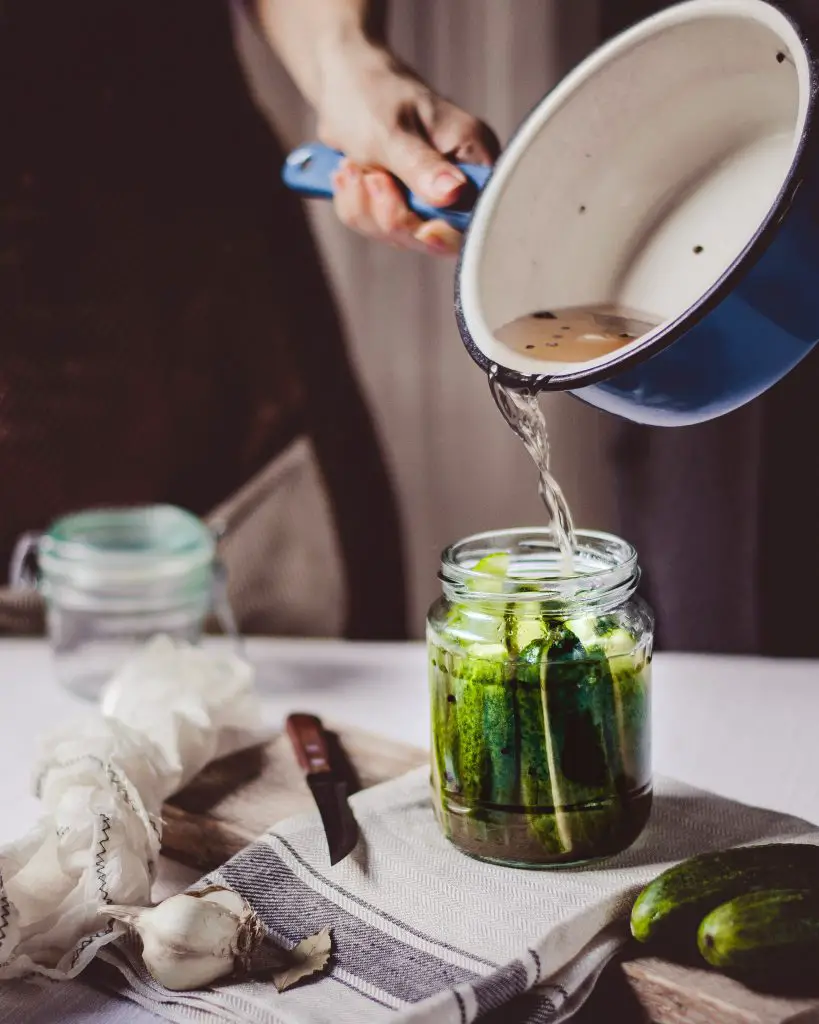
In some cases, the produce needs to be blanched or cooked until tender before being pickled. A example of a vegetable requiring this is beetroot. Once the fruit or vegetable has been prepared it is then pack them into sterilised jars. A heated pickling liquid is then poured over the produce before being sealed.
Most people tend to recycle old jars for storing pickles in however, if you planning to give some of your preserves as gifts you may what to purchase some attractive jars. There are many different types of jars available to purchase from Amazon.
The pickling solution most commonly consists of a mixture of vinegar and water which some contains spices, herbs, sugar and salt for additional flavour. Quick pickling generally works well with beetroot, cucumbers, carrots, cauliflower, peppers and beans to name a few vegetables
How To Quick Pickle Any Vegetable
Like other storage methods mentioned in this article Quick Pickling is best done with fresh fruit or vegetables that are blemish free. Any bruised or damage produce is best saved for relishes and sauces.
Preparing the Pickling Brine
Most brines in quick pickles consist of equal parts of vinegar and water however, this can vary alittle between recipes. The type of vinegar used doesn’t make a great deal of difference, basic vinegar is just fine and generally is cheaper than apple cider, white wine or rice vinegar. Any improvement in flavour produced by these more expensive vinegars is largely masked by the herbs and spices added.
The types of herbs and spices added to a pickling brine can vary widely depending upon the vegetable and the particular recipe being used. For example Carrots are sometimes pickled with a brine using Coriander, Ginger, Turmeric and Thyme. Other common combinations include Beans with Dill and Garlic or Tomatoes with Black Pepper and Garlic. A list of commonly used herbs and spices is provided below;
- Fresh or Dried Herbs: Dill, Thyme, Oregano, and Rosemary
- Whole Seeds: Caraway Seed, Mustard Seeds, Coriander Seeds, Peppercorns, Red Pepper flakes, Cloves
- Garlic and Ginger: Crushed or Sliced Thinly
- Ground Spices: Turmeric, Smoked Paprika or Cinnamon
A general quick pickle recipe is provided below to give you a feel of the quantities that are typical.
Ingredients
- 500g (approx 1 lb) of vegetables or Fruit.
- 2 sprigs fresh herbs (optional)
- 2 teaspoons whole spices (optional)
- 1 teaspoon dried herbs or ground spices (optional)
- 2 cloves garlic, smashed or sliced (optional)
- 1 cup vinegar
- 1 cup water
- 1 tablespoon salt
- 1 tablespoon of sugar (optional)
Method
- Clean and Dry Jars and Lids
- Prepare the vegetables by washing and drying them and cutting them to the desired shape.
- Pack the vegetables into the jars, ensure that the height of the vegetables in the jar is 2-3cm (1 inch) below the rim of the jar. This ensures that the pickling solution completely covers all the vegetables.
- Prepare the the brine. Place the vinegar, water, salt, sugar and any herbs into a saucepan. Bring to a boil to ensure that the salt and sugar are dissolved.
- Pour the hot brine over the vegetables. Gently tap the jars against the kitchen bench counter a few times to remove all the air bubbles.
- Seal the jars. Place the lids on the jars and screw on the lid until tight. Invert the jars a couple of times to ensure all areas of the jar is sterlised.
- Storage in a Cool Dark Place: These pickles will last for 12 months at least if unopened.
The Salt Brined Method
Salt-brined method is commonly used for vegetables such as Cucumbers and Zucchini and generally provides a more mild flavour than a quick pickling method.
Typically, the process starts with the vegetables being doused in salt for at least a few hours. However, some people leave the vegetables for an entire day. This process exacts the water from the vegetable allowing the brine to penetrate the vegetables more easily.
The excess salt is then rinsed off and the vegetables are drained. They are then packed into jars. Finally, the pickling liquid is added to preserve the vegetables. The brine is typically acidified with vinegar and flavours are added such as sugar, herbs and spices.
Vinegar Brine Method
The vinegar brine method is similar to the quick pickle method except that the first stage is the water is drawn out of the vegetables’ or fruits’ using salt. The pickling brine is then added to the vegetables. In some cases recipes require the vegetables to be cooked in the brine for a period of time.
Examples of these types of recipes include relishes and chutneys which are essentially are pickled foods that are finely chopped. The process of removing natural water from the vegetables serves to enhance the flavour.
Fermentation Method
The fermentation of vegetables is a distinctly different technique from the other pickling methods, though a salt-water brine is used. In this method the vegetables are covered in a salt-water brine. Typically, a weight is added on top to ensure that the vegetables are immersed into the solution.
During fermentation process the salt draws the liquid out of the cells that contains naturally occurring microbes that digest the sugars in the liquid. A byproduct of this process is the formation of lactic acid. The lactic acid reduces the pH to a level which preserves the vegetables. A well known example of this is Sauerkraut.
There are two main ways to ferment vegetables, either by dry salting (sprinkling salt onto the vegetables) or using a Brine. Dry salting is most suitable for vegetables that containing higher water levels. Cabbage for example is fermented by adding 1 – 2 tablespoons of salt per head of cabbage. The salt draws out water from the cabbage creating a salty liquid in which fermentation can occur.
When using a brines for fermentation the volume of salt should be between 2% to 5% by weight. ie 20 to 50 grams of salt per litre of water or 0.3 to 0.7 ounces of salt per quart of water. It is important to note that at levels below 2% salt bacteria or mould can survive and at levels above the rate of fermentation be reduced significantly or even stopped.
To ferment vegetables you will need a large container that has a lid to prevent contaminates from falling into the solution and a weight to hold down the vegetables. In fermentation it is critical that the vegetables remain submerged.
If you are trying fermentation for the first time Sauerkraut is a simple and easy place to start. To make Sauerkraut shred a whole cabbage head and place it into a container. Sprinkle 2 tablespoons of salt onto the shredded cabbage. Leave the cabbage for around 10 – 15 minutes, tossing and mixing every now and then. During this process you should observe the cabbage shrinking as the liquid is drawn out.
The next step is to pack the cabbage tightly into the container and pour any liquid over the stop. The aim here is for the cabbage to be completely submerged in the liquid. Additional, massaging of the cabbage may be required to draw more liquid out of the cabbage.
Once the cabbage is fully submersed place a weight onto the cabbage and cover the tops of the container with a cloth or place the lid loosely on the top of the container. Do not seal the container completely as the fermentation process produces Carbon Dioxide which needs to escape.
Leave the Sauerkraut to ferment at room temperature for at least 10 days however it is quite ok to leave it for several weeks. Check on the progress every few days by tasting it.
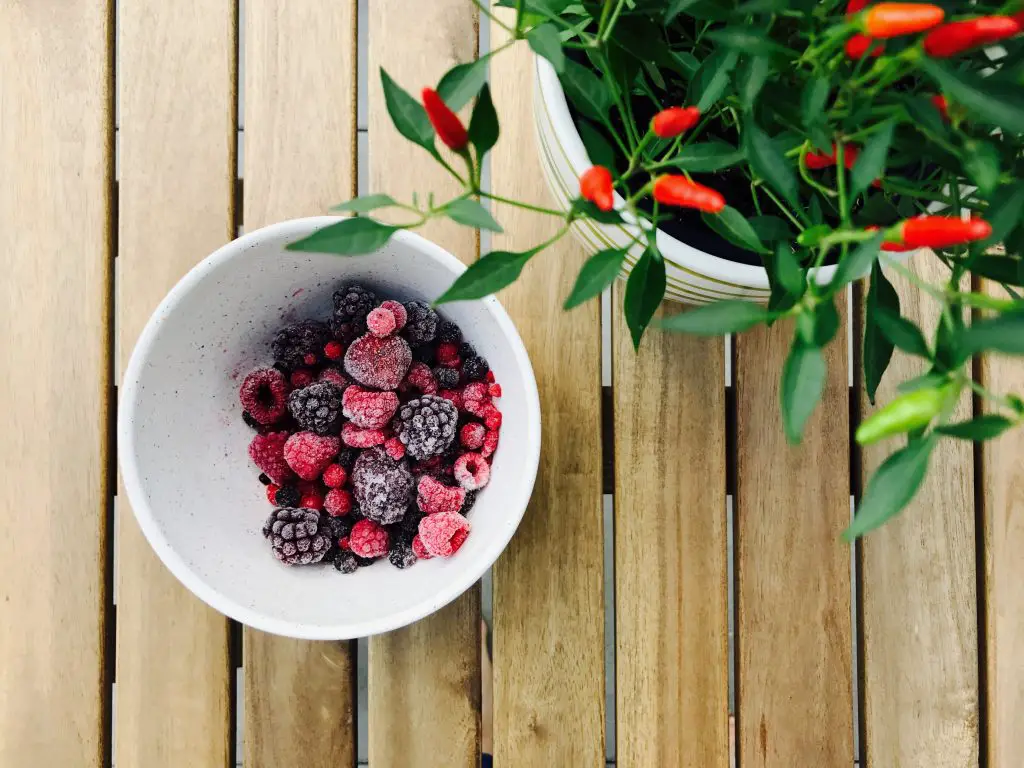
Freezing
Freezing vegetables is an extremely effective method of storage that suits most vegetables. However, its major draw back is that there is always a significant limitation due to the size of your freezer. As such it is a good ideal to be highly selective about what you freeze. Explore other methods before resorting to freezing, this method should be the last resort, not the first.
The freezer space should be reserved for vegetables that you prefer not to pickle or are generally difficult to store any other way. Example of this includes Cauliflower, Broccoli, French Beans, Peas, Zucchini and Corn. Additionally, it is good idea to consider the availability of the vegetable throughout the year, for those vegetables available for longer periods of time during the year it makes sense to reduce the relative size of the amount you freeze.
The other key consideration is the way the vegetables are processed prior to freezing. An example of this Zucchini which can be grated rather than stored as chunks. This will reduce the volume of space used however, this of course is dictated by the way you want to use the vegetable.
Expanding Freezer Space
If you are producing large volumes of vegetables you want to freeze then getting an additional freezer is a good idea. When buying an additional freezer it best to buy an upright freezer, rather than a chest freezer, even through they are more expensive. The reason for this, is that it is significantly more difficult to access food from a chest freezer.
Due to the accessibility, it is common for food at the bottom of the chest freezer to remain there for very long periods of time, simply because you need to remove everything on top of them out to access the items at the bottom.
To improve the accessibility even further upright freezers with glass doors are absolutely ideal. There is a variety of models like this available on Amazon which include double and single door models. Generally, large volume freezers are better as you will find that you quickly fill up your available space.
Blanching
Most vegetables that are frozen require blanching. Blanching is a process in which vegetables are boiled for a short period of time before being frozen. This process is necessary because it stops enzyme activity within the vegetable which prevents the vegetable from being broken down overtime. If the enzyme activity continues it will result in a loss of flavour, colour, and texture when frozen.
The length of time required to do this affectively varies depending upon the type of vegetable. The table below provides a guide on how long the vegetable should spend in boiling water.
| Vegetable | Blanching In boiling water (minutes) |
|---|---|
| Asparagus | 2 |
| Beans | 2 |
| Broccoli | 2 |
| Brussels Sprouts | 3 |
| Cabbage (Shredded) | 1 |
| Carrots | 3 |
| Cauliflower | 2 |
| Celery | 3 |
| Corn (on cob) | 5 |
| Corn – (kernels) | 2 |
| Leafy Greens | 1 |
| Kohlrabi | 2 |
| Okra | 3 |
| Peas | 1 |
| Peppers | 2 |
| Potatoes | 3 |
| Rutabagas | 3 |
| Squash – summer | 2 |
| Turnips | 3 |
| Zucchini | 1 |
For those unfamilar with the process below is a list the step that need to be taken.
- Step 1: Wash the vegetable and prepare the vegetable. Cut the vegetables to the desired size. It is best if they are already cut to a size that will suit the recipe you intend to use them in.
- Step 2: Blanch the vegetable. Bring a large pot of water to boil, if you are doing large volumes of freezing and preserving it is really worth while to get a Jam pan as they are significantly bigger than other saucepans click here to see the pan that I use. At the same time fill a large bowl with ice water prior to starting the blanching process. Once the pot has reached a rolling boiling, add your vegetable into the water. Use a time to ensure that the time spent in the water is exactly the intended time. After the specified cooking time remove the vegetables from the pot, and place the vegetable into the ice water to stop the cooking process. Cool the vegetable for a few minutes and allow it to drain.
- Step 3: Prepare the Vegetable for freezing and Packing. Spread the vegetable out on a tray and freeze. This is done to avoid pieces sticking together which will make the vegetables more difficult to use later. Once the vegetables are frozen solid pack the vegetables into a container or plastic bag. Ensure each bag or container is labelled with dates.
When freezing vegetables it is generally best to pick the vegetable from the garden when they are at their best. Try to blanch them on the same day the picked to ensure they are of the highest possible quality. It is best to do this by blanching vegetables in small batches.
